This ROS Noetic package is intended as a visual SLAM navigation system for a Clearpath Robotics Husky equipped with a ZED 2i stereo camera. RTAB-Map visual SLAM is used with the ROS navigation stack, allowing the husky to map and autonomously navigate. This package was designed for navigation around an outdoor garden bed.
This tutorial assumes you already have ROS Noetic installed on your machine. If not, you can follow the official guide.
To install the husky_stereo_nav package, you will need a catkin workspace. If you do not already have one, you can create one like this:
mkdir -p ~/catkin_ws/src
cd ~/catkin_ws
catkin init
Next, you need to clone the husky_stereo_nav repository into your catkin_ws:
cd catkin_ws/src
git clone https://github.com/UM-ARM-Lab/husky_stereo_nav.git
Before you can run husky_stereo_nav, you need to install several ZED dependencies. Follow this tutorial to install the ZED SDK, and this tutorial to install the ZED ROS wrapper.
Now you can install the rest of the husky_stereo_nav dependencies using rosdep, and then build the package:
cd ~/catkin_ws
rosdep install --from-paths ~/catkin_ws/src --ignore-src -y --rosdistro=noetic
catkin build
Finally, you need to source your workspace:
source ~/catkin_ws/devel/setup.bashNow you should be ready to run husky_stereo_nav.
Because the ZED stereo camera requires a GPU to run, which the Husky onboard computer doesn’t have, and the Husky drive controller must run on the Husky, we have to run ROS with 2 separate machines. All of the navigation nodes run on the Razer laptop, while the Husky control nodes and ROS master run on the Husky onboard computer.
- In order to run ROS commands from the laptop correctly in this configuration, you need to:
- either connect to the Husky wifi hotspot (called “husky” in the list of available networks) and then run
source <husky_stereo_nav package path>/scripts/remote-husky.bash(on the laptop this is also available assource ~/remote-husky.bash) - or connect the laptop to the husky directly via ethernet using an ethernet to USB adapter on the laptop, and then run
source <husky_stereo_nav package path>/scripts/eth-remote-husky.bash(on the laptop this is available assource ~/eth-remote-husky.bash - This file must be sourced in every new bash instance you open
- either connect to the Husky wifi hotspot (called “husky” in the list of available networks) and then run
.dbfiles: these are where RTAB-Map (SLAM software) stores its 3D mapping information, as well as various other data, for a particular session.pgmfiles: these are image files containing 2D static maps.yamlfiles: these contain metadata associated with a certain.pgmfile and are used to load static maps from, they should have the same name as the corresponding file
- copy desired
.dbfile to~/.ros/rtabmap.db- When navigating on the Wilson Center roof, you should use our layered master map, located in Big Narstie at
aliriley/maps/roof_master/roof_master.db, this directory also contains the corresponding.yamland.pgmfiles
- When navigating on the Wilson Center roof, you should use our layered master map, located in Big Narstie at
- copy the corresponding
.yamland.pgmfiles intohusky_stereo_nav/maps - on line 11 of navigation.launch where the
static_map_patharg is defined, change the path to the path of your.yamlmap file roslaunch husky_stereo_nav navigation.launch- wait 30 seconds to 1 minute for everything to start (you should see the 2D map and the robot footprint outline appear in RViz)
- manually drive the robot around until it has localized in the map
- send desired navigation goals using the 2D Nav Goal button in RViz
- To begin mapping, run
roslaunch husky_stereo_nav mapping.launch
Mapping consists of running SLAM while driving around a desired area in order to get three general properties:
- An accurate 3D (pointcloud) map of the environment
- An accurate 2D obstacle costmap of the environment
- A map where accurate loop closures can be detected frequently from anywhere in the map, meaning the robot can frequently correct its localization drift/error, even under a variety of different lighting conditions
It is relatively easy to make a map with the first two properties, but the third is much more difficult and requires a lot of care in the mapping procedure. Although we have already created a combined map that fulfills these properties to the best of our ability, if a new map is desired this is the procedure for making one:
-
be sure to drive the Husky in “slow” mode by holding down the left bumper and not the right one
-
The ZED camera has a minimum distance of about 0.5 meters. When mapping features close to the camera, it will often perform unreliably, either falsely gauging obstacle distance or not seeing them at all. To avoid this, try to keep the camera at least a meter away from all obstacles.
-
As you drive, watch the progress of the both the 2D map and the 3D map point cloud, as well as the loop closure graph
-
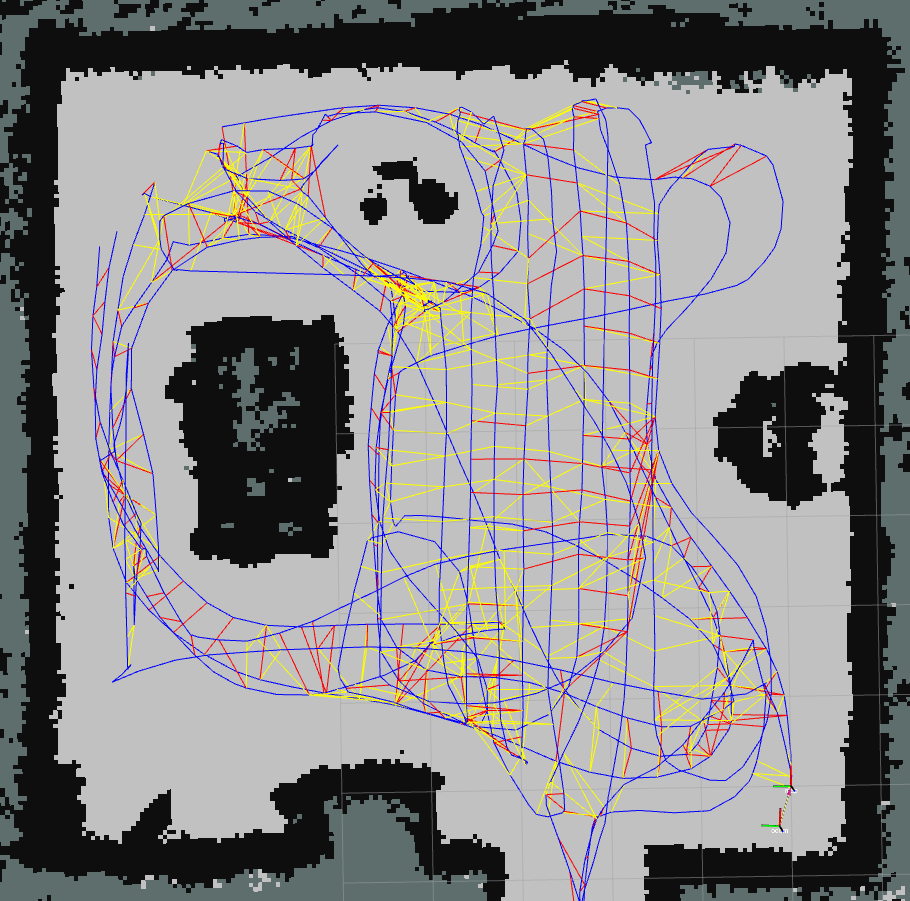
To ensure frequent localization, it is important that maps have accurate and widespread loop closures. Loop closures are visualized in rviz in the loop closure graph by red and yellow lines connecting RTAB-Map nodes, while blue lines represent connection through odometry. When mapping, ensure that loop closures are being found frequently and between nodes throughout the entire map. Loop closures are found by revisiting previously explored areas of the map. If an area is not getting any loop closures, revisit this location from different orientations.
-
Here is an example map with reasonably good node coverage and a good amount of loop closures:

-
When navigating on the roof using waypoints (see series of waypoints below), the location of the predetermined waypoints are relative to the origin of the map. Thus if you want to use the same set of waypoints with multiple map files, the map origins will need to be in the same place. On the bottom right corner of the roof, there are three pieces of tape serving as alignment markers. To begin mapping in the same location, align the three 3D printed alignment sticks located on the Husky’s bumpers with the x marks on the tape alignment markers. Repeating this process prior to mapping will ensure that the maps will have origins in the same place relative to the roof.

The general order of operations when mapping is as follows:
-
wait 30 seconds to 1 minute for everything to start and for the camera exposure to adjust correctly (you should see the beginnings of a 2D map and a 3D map point cloud)
-
start driving around the desired area in a large loop, trying to get most of the boundaries in the map, and returning to the start to get a loop closure
-
then drive in a few other loops around the area, making sure to loop in both directions. This is to provide some initial locations where loop closures can be detected, which will be useful for the rest of the mapping process
-
Next, drive back and forth across the area in a “lawn mower” pattern, making passes 1-2 ft apart. this will provide good node coverage across the entire map
-
It is especially important to get good coverage of areas in the map where the robot’s vision will be obscured, such as the area around the garden in our case. Make sure to drive around these areas several times, frequently stopping to rotate in place in order to make a variety of perspectives of the area available for loop closure detection
-
Once you have good loop closure graph coverage of the area, you can drive to any areas of the map that weren’t filled in (green pixels on the 2D map)
-
once you have filled in your desired area on the map, you might have a few false obstacles and malformed shapes. If so, do this to fix them:
- in RViz, hide the 3D map point cloud so you can better see the projected 2D map
- drive to these locations such that the features are in view of the camera
- to fix false obstacles (obstacles that exist in the map but not in real life), let the robot sit with the area in frame for a few seconds. If they don’t clear up, try to view them from a different perspective and do the same
- to fix a malformed feature, drive slowly around the feature and let the robot sit for a few seconds at a variety of different perspectives
- use the 2D map as feedback, once the problems disappear in the map you can move on
-
While mapping, you may sometimes see features of the map drifting off incorrectly, like this:

- This likely means the odometry has drifted, and can usually be fixed by finding a loop closure
- so drive back to a previously visited pose and try to follow that previous path until the map corrects itself
- If it doesn’t correct itself, you will have to restart the mapping process
-
When the map is complete, we recommend driving the husky back to the map origin located at the tape alignment markers. This way you can check how close the robot base_link is to the map pose and thus get an estimate for how accurate the map is as a whole.
-
After mapping is complete, you need to save both the 2D map and 3D map:
roscd husky_stereo_nav/maps./record_maps.bash- enter the name you want to give your map
- go to the terminal where the mapping launch file is running and kill it with ctrl+c
- go back to the map recorder terminal and press enter
- now there should be
<name>.db,<name>.pgm, and<name>.yamlall in thehusky_stereo_nav/mapsfolder
-
When the Husky is intended to navigate in variable lighting conditions, it is recommended to generate one more robust
.dbfile by combining multiple.dbfiles recorded under different lighting conditions. For example, record a map of the environment on a sunny morning and a cloudy afternoon. To combine these maps together, run in your terminal:

rtabmap-reprocess "<path_to_first_map.db>;<path_to_second_map.db>; ..." <name_of_combined_map.db>- To view previously created
.dbfiles, use the rtabmap-databaseViewer tool which allows you to view the 3D point cloud, loop closures, and other useful information about the map. Run in your terminal:
rtabmap-databaseViewer <your_map.db>- To begin navigation, run
roslaunch husky_stereo_nav navigation.launch. - In the event that the husky must be stopped while navigating, use the handheld e-stop. Following the use of the e-stop, the navigation launch file must be restarted and the e-stop reenabled for the husky to begin navigating again. So long as the e-stop is not in triggered mode, the remote controller should work. You should not need to restart the husky following the use of the e-stop.
- RTAB-Map records the location of the robot in its
.dbfile, so on startup it will assume the robot is still in the last place you left it while that rtabmap session was running - If you moved the robot since the last time mapping or navigation was running, you will have to detect a loop closure to relocalize
- to do this, drive slowly around the area, occasionally stopping for 10-15 seconds until you see the robot footprint jump to the correct location
- If you want to be extra sure you detected a loop closure, you can use our loop closure counter by running
rosrun husky_stereo_nav count_loop_closures.pyin one terminal,rostopic echo /loop_closure_countin another, and waiting until the number goes above 0 - On the roof specifically, we’ve noticed that some locations (probably ones with more distinguishable features) are better for localizing. If you have trouble localizing, make sure to try driving around the entire area to get as much coverage as possible
- Once the robot is properly localized, use the 2D Nav Goal button in rviz to specify a goal. This goal must be reachable by the robot, i.e. not in an obstacle or obstructed by obstacles
- to use the 2D Nav Goal button, click on the location you want the goal to be, then drag the arrow in the direction you want the front of the Husky to face, then release to enter the goal
- Once the goal has been entered, navigation will start. You can monitor the status of navigation by running
rostopic echo /move_base/status. Upon entry of a goal, the status text field should say“This goal has been accepted by the simple action server” - If the goal is reachable, the global plan will be drawn as a green path in RViz
- If the navigation stack can’t plan a global path, it should rotate in place up to 2 times in order to clear the local costmap and try to replan. If this is unsuccessful or it can not complete recovery behaviors, it will terminate and the status will read “
Failed to find a valid plan. Even after executing recovery behaviors.” - once the global path is created, the local planner will start driving along it. at each timestep you will be able to see the local planned trajectory as an orange path in RViz
- As the robot drives along the global path, it will plot a white path in RViz representing the actual path it has followed, which can be compared to the desired global path in green
- As the robot tries to follow the global path, it may get stuck, in which case it will try to execute a few recovery maneuvers including backing up and rotating in place 2 times.
- once the robot reaches the goal (meaning it is within the
xy_goal_toleranceandyaw_goal_tolerancespecified inconfig/trajectory_planner.yaml), the robot will stop moving and await the next entered goal
-
If you want to instead navigate to a series of predetermined locations, you can use our send_waypoints node
-
first, put your coordinate sequence in a JSON file in the following format:
[
    {
        "position": {
            "x": -0.85,
            "y": 2.34,
            "z": 0.0
        },
        "orientation": {
            "x": 0.0,
            "y": 0.0,
            "z": 0.0,
            "w": 1.0
        }
    }
]
these coordinates are in the
mapframe, which will have its origin at the place you started recording the map -
then change line 14 of
navigation.launchto set the paramwaypoint_sequence_pathto the path of your JSON file (you can also set this param with arosparamcommand) -
after launching
navigation.launch, in a new terminal window runrosrun husky_stereo_nav send_waypoints.py -
the series of goals will then be executed one by one, and you will see the end state of each goal reported on the command line
-
After each goal, you need to press enter to continue to the next goal, or instead you can press ‘c’ then enter in order to cancel the rest of the goals
-
if you instead want all the goals to be sent sequentially without requiring user input, you can run
rosrun husky_stereo_nav send_waypoints.py _wait_between_goals:=trueinstead of the original command
RLException: Unable to contact my own server at [http://192.168.131.3:46067/].
This usually means that the network is not configured properly.

A common cause is that the machine cannot connect to itself.  Please check
for errors by running:

	ping 192.168.131.3

For more tips, please see

	http://wiki.ros.org/ROS/NetworkSetup

The traceback for the exception was written to the log file
RLException: run_id on parameter server does not match declared run_id: a7686552-1345-11ed-b1ee-9571e6692334 vs d167be52-1359-11ed-a4cf-f5b0987eef57
The traceback for the exception was written to the log file
RLException: ERROR: unable to contact ROS master at [http://10.42.0.1:11311]
The traceback for the exception was written to the log file
- These errors can happen when you try to launch either navigation or mapping while connected to the Husky wifi hotspot (although it can also happen when connected over ethernet), and is caused by high network latency. If you keep on trying to run the same command, usually it will eventually launch once the network delay goes away (although sometimes it can take a while). If this isn’t working, you can try disconnecting and reconnecting to the husky hotspot, or power cycling the Husky.
odometry: Could not get transform from base_link to zed2i_left_camera_optical_frame (stamp=1659552094.128832) after 0.100000 seconds ("wait_for_transform_duration"=0.100000)! Error="canTransform: target_frame base_link does not exist.. canTransform returned after 0.100702 timeout was 0.1."
- This happens when you launch navigation or mapping and you didn’t source the correct setup file. This is caused by the ROS master running on the laptop and therefore not getting connected to the Husky, so the Husky URDF isn’t available and therefore several transforms that we use aren’t available. To fix this, simply follow the instructions in the ROS Multi Device Setup section, being sure to source the correct file.
computeCorrespondences() A large number (320/320) of stereo correspondences are rejected! Optical flow may have failed because images are not calibrated, the background is too far (no disparity between the images), maximum disparity may be too small (128.000000) or that exposure between left and right images is too different.
- If you see this error constantly and there is no longer a transform from
odomtobase_link, then it means the visual odometry has lost track and is unable to localize anymore. This usually happens when something entirely covers up the ZED cameras, and can be fixed by restarting the launch file. It’s okay for this error to show up once in a while, as long as the transform still exists. - Also remember that due to the ZED camera's minimum distance restriction, it will not perform well when too close to obstacles. This could cause lost correspondences as well as unpredictable live obstacle detection behavior in the local costmap.
Additional documentation can be found here.